Sunday, October 30, 2016
Auto-hide dock with a keyboard shortcut
I like mac os dock, but sometimes when I need more of my screen I hide it. Before (I don't know up to which version exactly) one can change dock properties directly from apple icon on top left. Not anymore :(. Now to do that you need to open System preferences, select dock and select or unselect "Automatically hide and show the Dock".
As you can see it is a lot of steps. Luckily there is a shortcut for that and it is command+option+D.
Saturday, June 11, 2016
Wednesday, March 23, 2016
How To Crop Multiple Images on Photoshop (at once)
Hi all, I have another post for you which works on both mac and windows if you have Photoshop. Have you ever needed to re-size, crop, change color or do anything on mac to a folder of pictures. I do. And it is for 1000 pictures so making it one by one is a tedious work. So I searched online and find this method. It is automate option on photoshop and you use it with anything.
Here are the steps,
1. Create two folders one for images to be cropped (input) and one for output.
2. Open one image on input folder with photoshop.
3. On windows tab select "actions"
 4. From actions window click new action button


Here are the steps,
1. Create two folders one for images to be cropped (input) and one for output.
2. Open one image on input folder with photoshop.
3. On windows tab select "actions"

5. Name your action and it will start recording. Do your formatting what ever it is. Save your modified image using save as button to your target folder and select output parameters before stopping record.
6. Once you successfully save the modified image, click stop and go to File>Automate>Batch

7. Select input and output folders and don't forge to select override action "Save As" command button.

8. Enjoy :)
Saturday, January 23, 2016
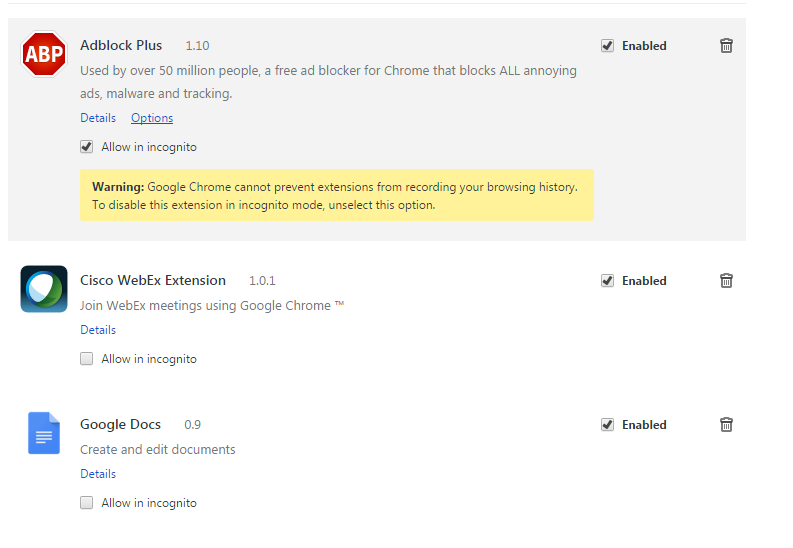
How to enable chrome extensions to run in incognito mode
Did you realize your carefully curated google chrome extensions are not working in incognito mode? Yes I am looking at you AdBlock Plus :) This is because they are disabled by default but it is possible to enable them to work under incognito mode. Of course google disclaims it can send information to that extension server so it may not be 100% incognito anymore. By the way this method holds both for osx and windows/
Here are the steps to enable extensions to run in incognito mode.
1. Go to chrome://extensions/
2. You will find a radio box under each extension saying "Allow in incognito", select it for the ones you want
3. Enjoy.

It is that easy. I wonder why it took me so long to find this. Hopefully you found it much soon after you realized/wanted it.
Here are the steps to enable extensions to run in incognito mode.
1. Go to chrome://extensions/
2. You will find a radio box under each extension saying "Allow in incognito", select it for the ones you want
3. Enjoy.
It is that easy. I wonder why it took me so long to find this. Hopefully you found it much soon after you realized/wanted it.
Monday, July 13, 2015
How to force internet recovery on Mac osx
Although Mac osx is very stable, sometimes thing go wrong. And Murphy's law suggests it goes wrong on the worst possible time. Recently my Mac start being very very slow and irresponsive. I tried to check disk permission and first aid. Ther e were bunch of permission issues, I fixed all but one. I searched for the remaining one online and found that it it not important yet my Mac runs extremely slow. So I decided to format it. You can boot from recovery partition if you configured one by holding alt key on boot up. But in my case even recovery partition was unusably slow. So I searched and found a short cut for internet recovery,
Press option+command+r on boot up and you will go to internet recovery
If you press command+r it will point you to recovery partition or internet depending on whether or not recovery partition is configured.
I hope you don't need to use this. In case you needed I hope it helps.
Press option+command+r on boot up and you will go to internet recovery
If you press command+r it will point you to recovery partition or internet depending on whether or not recovery partition is configured.
I hope you don't need to use this. In case you needed I hope it helps.
Thursday, February 19, 2015
How to write to NTFS drives on Mac OSX
Mac OSX comes with NTFS drivers only for reading. You may ask why do i need read and write support. That is because the file system drivers mac comes with have some limitations. HFS is only visible to mac that means if you have an HFS external drive you can not see content on a pc (for HFS driver for pc see this article). If you choose to use fat32 you can not copy files larger than 4 gb. And fat and exfat are not very safe (I mean dependable if you take your external hard drive without removing it first it can damage and it damages a lot...). Also last but not least if you use bootcamp and have a windows on your mac you will want to transfer files between your OS'.
So here comes the manual. There are couple of third party application which offer faster speeds and support (like paragon and tuxera) . But if you are a freebie like me you would prefer a free solution.
Here are the steps
source:
http://www.macbreaker.com/2014/06/how-to-enable-writing-to-ntfs-hard.html
So here comes the manual. There are couple of third party application which offer faster speeds and support (like paragon and tuxera) . But if you are a freebie like me you would prefer a free solution.
Here are the steps
- Download and install osxfuse from http://osxfuse.github.io/
- Make sure to check "MacFuse compatibility layer" when prompted.

- Download and install NTFS-3G from http://macntfs-3g.blogspot.com/2010/10/ntfs-3g-for-mac-os-x-2010102.html
- If you are using Lion or above, you also need to download and install fuse-wait from https://github.com/bfleischer/fuse_wait/downloads
- That's it enjoy your ability to read/write to NTFS volumes!
source:
http://www.macbreaker.com/2014/06/how-to-enable-writing-to-ntfs-hard.html
How to get rid of the new button on Chrome
Year 2014 was the year I learnt not to update. Any software update brought me anything but limitation. On the case of browsers though it is hard to resist update since they contain security patches. One recent update that disappointed me is by google chrome. After the update there is a "Person" button appeared on the right top corner of the window and it is occupying a lot of space.

Also I don't sign in to chrome so it is not useful at all. To remove that button you can follow the steps below. Note that this is applicable to windows systems as well.
Steps
1. On your chrome browser go to "about://flags"
2. Find "Enable the new avatar menu"

3. From the radio button select "Disabled"
4. You are done. Restart your browser and enjoy.
Also I don't sign in to chrome so it is not useful at all. To remove that button you can follow the steps below. Note that this is applicable to windows systems as well.
Steps
1. On your chrome browser go to "about://flags"
2. Find "Enable the new avatar menu"
3. From the radio button select "Disabled"
4. You are done. Restart your browser and enjoy.
Subscribe to:
Posts (Atom)

-
 Today there is an app for most of the things at least for iPhone. But yet there might me some stuff you care only accessible from a website....
 -
 Hi all, I have another post for you which works on both mac and windows if you have Photoshop. Have you ever needed to re-size, crop, change...
 -
Apple HFS+ drivers DO work after 1607 Anniversary Update, they just have problems mounting the drives. You can mount them manually with the ...