Sunday, February 15, 2026

export video transcript

YouTube Transcript Exporter

YouTube Transcript Exporter

Enter a YouTube video ID to fetch its transcript.

Transcript will appear here…

video4

Kid-Safe Player + Caption Box

AI Content Filter Interface

Captions will appear here (Simulation Mode)...
System Active

Video player3

YouTube Player with External Captions

YouTube Player

Captions will appear here…

Custom Video Player 2

YouTube Player Loader

YouTube Player

Captions will appear here…

Custom Youtube Player

YouTube Player Loader

YouTube Player

Captions will appear here…

Wednesday, October 6, 2021

How to see mac partitions on Windows 10

Apple HFS+ drivers DO work after 1607 Anniversary Update, they just have problems mounting the drives. You can mount them manually with the risks associated with it. (Personally I have encountered exactly zero bugs/problems in several weeks of hard usage and testing on 3 computers, so I started recommending my method on net. I am writing this warning anyway, as mounting a partition forcibly may still have unforeseen consequences I have yet to face..)

Firstly, make sure you have drivers from 6.0 installed, 6.1 does not have HFS+ drivers. You can reinstall to be sure, or

go to Windows\system32\drivers\ check if AppleHFS.sys and AppleMNT.sys is there. 

Run regedit, go check if "AppleHFS" and "AppleMNT" keys exist in "HKEY_LOCAL_MACHINE\SYSTEM\CurrentControlSet\services\"; each should also have some string and dword values in it.

Personally, I would extract these two .sys files from an 6.0 install, google on how to install them via registry tweaks, and make the habit of always using most up-to-date bootcamp drivers. Apart from bug fixing and optimisations, new macs a few years into future will just not function properly on 6.0 drivers.

Reboot after installing your Apple HFS drivers. Nothing will show up on 1607 after reboot, but I would still feel better to install these drivers before we try and mount them.

Secondly, make sure you are not using CoreStorage. I am reasonably certain "read only" HFS driver can't do any harm, but its better to be safe than sorry. 

If you are good to go, you have two options;

Option#1; mount your bootcamp partion via DOS Devices registry edit;

Run regedit, navigate to "HKEY_LOCAL_MACHINE/system/CurrentControlSet/Control/Session Manager/DOS Devices/"

Right click->new->add string

Enter your drive letter by adding ":" In "data" type "\Device\HarddiskVolume#", where # will be the volume number of your partition as it would be detected in MS-DOS. In your case it SHOULD be 2, as it is the 2nd partition of disk0. (In MY computer, disk0 has 1 partition, my MacOS partition is 2nd one on disk1, so MY partition number is 3, just count your partitions starting with 1.)

Your registry entry should (provided nothing is changed in 4 months you posted this) show "D:", "REG_SZ" and "\Device\HarddiskVolume2" for name, type and data respectively (assuming D: is the drive letter you want for your macOS partition). 

Never use letter C: or any other drive letter that may contradict with your Windows installation, as this may render your windows unbootable. (Or may not, its just a matter of luck whether windows choses to mount DOS devices first, or its own disk management.) It is (probably) safe to do trial and error on volume #, it won't break anything even if you accidentally select your windows partition, it will just mount it twice with different letters.

Reboot and your MacOS partition should be there. 

Before using, go to properties of your new disk in "This PC" and your "file system" should be HFS and it should report used and free spaces correctly. If it is RAW, never try to reformat, check your AppleHFS.sys install. 

Option#2; use a program that can mount disks via Session Manager (in other words it will make the registry entries for you). 

Download ext2fsd even though you probably have nothing to do with ext2 or linux.

Open Ext2 Volume Manager. In "File System" tab, your macOS partition will show as "HFS". If you installed ext2fsd before succesfully installing bootcamp drivers, it will just show as "RAW". (kind of proving bootcamp drivers DO work)

Right click, select assign drive letter (or change drive letter).

In the pop-up menu, select the drive letter first, then select the tick "Create a permanent MountPoint via Session Manager." It -weirdly- closes the pop-up before you click "OK". (Ext2fsd is a little buggy, you should select drive letter first, then select the tickbox. If you want to change drive letter, I suggest removing the existing one first, then re-add it from scratch)

Reboot, and the macOS partition will be there just like before anniversary update.

In both options, your diskpart or disk management will still show your HFS partition as RAW, (so does minitool partition wizard etc), but it will function normally, and you should be able to confirm it as HFS in properties menu. In analogy, this method tries to define your partition letter like defining a legacy COM or Printer (LPT) port.


Source: https://apple.stackexchange.com/questions/251656/how-can-i-make-mac-partition-visible-in-bootcamp-windows-10-anniversary-update
Friday, November 2, 2018

How to play youtube on background for Android and ios

Hi all,

This used to be very easy on both Android and IOS before youtube decided to release youtube red. Luckily there is a workaround.

It is pretty much same for both android and ios. 1. You need to use chrome.
2. Request desktop mode
3. Start your video
4. Go to your home screen
5. Your video will pause slide to audio options and resum
6. Thats all enjoy!

Credit to linked video:

https://www.youtube.com/watch?v=wr7Gy7VINB8&app=desktop

Saturday, December 9, 2017

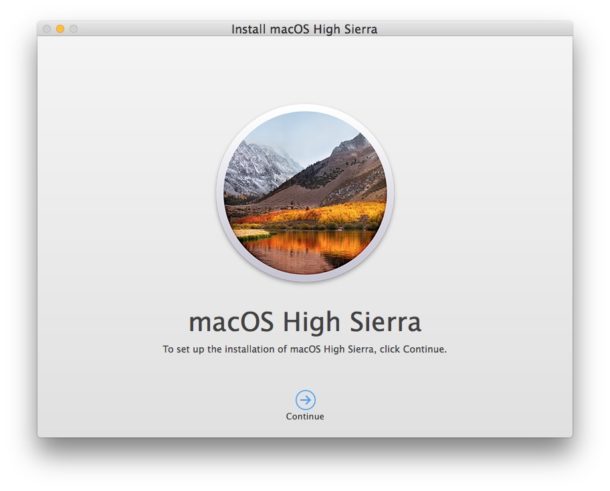
How to Create a Bootable Install Drive for macOS High Sierra How to make a macOS High Sierra USB boot installer drive

Some Mac uses like to create a bootable USB installer drive for macOS High Sierra. A bootable install volume of macOS 10.13 allows users to perform a variety of tasks including formatting and clean installs, updating multiple Macs from the same USB flash drive installer (and without re downloading), and to use as a troubleshooting boot drive should the need arise, amongst other benefits for advanced and more technical users. 
This walkthrough will detail how to make a bootable USB install drive for macOS High Sierra. 

Requirements to Create a macOS High Sierra Bootable USB Installer

To create a functioning macOS High Sierra installer boot drive, you will need the following:

  • A Mac with access to the App Store

Beyond that you’ll just need a bit of patience and a bit of technical know-how or comfort following technical instructions. Making a USB install drive requires the usage of precise syntax at the command line with superuser privileges, using the wrong syntax could lead to unintended data loss.

How to Make a Bootable USB Installer for macOS High Sierra

  1. Connect the USB flash drive to the Mac, if you need to format it go ahead and do so
  2. Download macOS High Sierra installer application from the App Store* and be sure the complete installer is located in the /Applications/ directory 
  3. When the installer has completed downloading, it will automatically launch – quit out of the installer when this occurs
  4. Open the “Terminal” application found in /Applications/Utilities/ directory on the Mac
  5. Enter the following command syntax at the command line, replacing “UNTITLED” with your USB drive name if necessary:
  6. sudo /Applications/Install\ macOS\ High\ Sierra.app/Contents/Resources/createinstallmedia --volume /Volumes/UNTITLED && say Boot Installer Complete

  7. Confirm the syntax is exactly as written, then hit the RETURN key and enter the administrator password to start making the High Sierra installer drive *
  8. command syntax to create macOS High Sierra boot installer
  9. Let the installer complete, when finished you will be informed that the process has completed
Once you have created the USB boot installer drive for macOS High Sierra, you can either launch it immediately to install macOS High Sierra on the current Mac, reboot and startup from the USB installer drive, or eject it and use it on another Mac. 
* Note: if you are getting a “command not found” error and you are certain your syntax is correct, be sure to check the file size of the “Install macOS High Sierra.app” as found in the /Applications folder. If the file size of the High Sierra installer is not over 5GB then you have the incomplete installer and will need to download the complete macOS High Sierra installer application as described here in order to create a bootable installer drive.

Booting from the macOS High Sierra USB Installer Drive

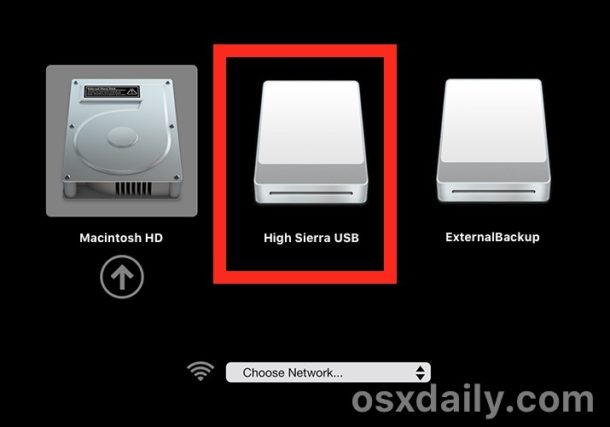
With the newly created macOS High Sierra USB installer drive connected to the Mac, reboot the computer. Immediately on reboot, start holding down the “OPTION” (ALT) key to load the boot menu. Select the High Sierra installer at this screen.
Choosing the macOS High Sierra boot installer
Once booted from the USB drive you can proceed with installing macOS High Sierra, using the Disk Utility tools to format or erase a volume, work with Time Machine, and other similar tasks.
MacOS High Sierra installer
If you had previously created a boot installer for the High Sierra beta you may notice the syntax is different for createinstallmedia is different with the final version, part of that is to accommodate the new file name of the application installer, and the remainder removes the necessity of the –applicationpath flag and directive. 
Keep in mind that macOS High Sierra can only be installed onto supported hardware, if you’re uncertain whether or not a particular computer supports the release you can check this list of macOS High Sierra compatible Macs.
Do you know of another approach to making a macOS High Sierra bootable install drive? Do you have an easier method, or do you have any particular tricks related to this process? Let us know in the comments.

Source: http://osxdaily.com/2017/09/27/create-macos-high-sierra-bootable-installer-usb/

Thursday, November 30, 2017

How to delete a file immediately in OS X

This was a feature I was looking for a long time. Anybody coming to OS X from windows misses shift+del option. Now we have it in OS X as well. Starting from El Capitan (10.11) you can do alt+command+delete (⌥+⌘+delete) to immediately delete something. Moreover individual deletion option came to trash can. Good work Apple keep doing it!

Sunday, October 30, 2016

Auto-hide dock with a keyboard shortcut

I like mac os dock, but sometimes when I need more of my screen I hide it. Before (I don't know up to which version exactly) one can change dock properties directly from apple icon on top left. Not anymore :(. Now to do that you need to open System preferences, select dock and select or unselect "Automatically hide and show the Dock". As you can see it is a lot of steps. Luckily there is a shortcut for that and it is command+option+D.

Saturday, June 11, 2016

Unit Converter

Proselytum

Unit Converter

Hello World!

Wednesday, March 23, 2016

How To Crop Multiple Images on Photoshop (at once)

Hi all, I have another post for you which works on both mac and windows if you have Photoshop. Have you ever needed to re-size, crop, change color or do anything on mac to a folder of pictures. I do. And it is for 1000 pictures so making it one by one is a tedious work. So I searched online and find this method. It is automate option on photoshop and you use it with anything.

Here are the steps,

1. Create two folders one for images to be cropped (input) and one for output.
2. Open one image on input folder with photoshop.
3. On windows tab select "actions"
4. From actions window click new action button
5. Name your action and it will start recording. Do your formatting what ever it is. Save your modified image using save as button to your target folder and select output parameters before stopping record.
6. Once you successfully save the modified image, click stop and go to File>Automate>Batch

7. Select input and output folders and don't forge to select override action "Save As" command button.

8. Enjoy :)


Saturday, January 23, 2016

How to enable chrome extensions to run in incognito mode

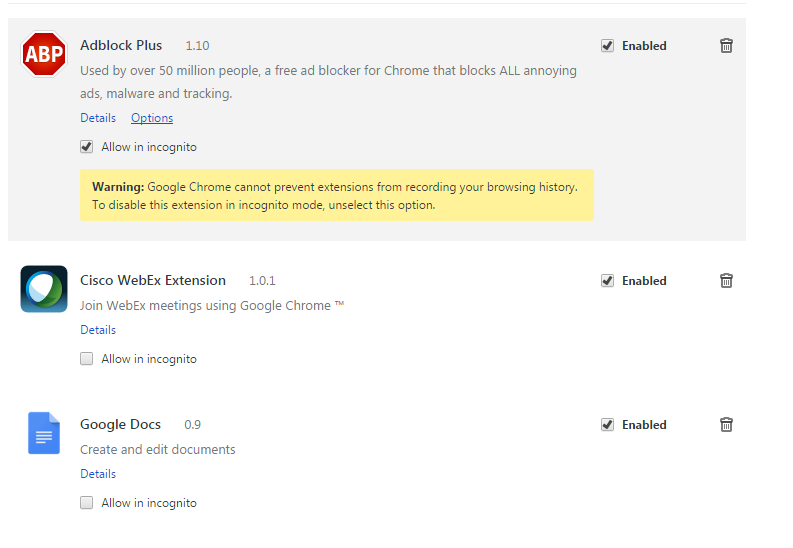
Did you realize your carefully curated google chrome extensions are not working in incognito mode? Yes I am looking at you AdBlock Plus :) This is because they are disabled by default but it is possible to enable them to work under incognito mode. Of course google disclaims it can send information to that extension server so it may not be 100% incognito anymore. By the way this method holds both for osx and windows/

Here are the steps to enable extensions to run in incognito mode.

1. Go to chrome://extensions/
2. You will find a radio box under each extension saying "Allow in incognito", select it for the ones you want
3. Enjoy.


It is that easy. I wonder why it took me so long to find this. Hopefully you found it much soon after you realized/wanted it.


Monday, July 13, 2015

How to force internet recovery on Mac osx

Although Mac osx is very stable, sometimes thing go wrong. And Murphy's law suggests it goes wrong on the worst possible time. Recently my Mac start being very very slow and irresponsive. I tried to check disk permission and first aid. Ther e were bunch of permission issues, I fixed all but one. I searched for the remaining one online and found that it it not important yet my Mac runs extremely slow. So I decided to format it. You can boot from recovery partition if you configured one by holding alt key on boot up. But in my case even recovery partition was unusably slow. So I searched and found a short cut for internet recovery,

Press option+command+r on boot up and you will go to internet recovery

If you press command+r it will point you to recovery partition or internet depending on whether or not recovery partition is configured.

I hope you don't need to use this. In case you needed I hope it helps.

Thursday, February 19, 2015

How to write to NTFS drives on Mac OSX

Mac OSX comes with NTFS drivers only for reading. You may ask why do i need read and write support. That is because the file system drivers mac comes with have some limitations. HFS is only visible to mac that means if you have an HFS external drive you can not see content on a pc (for HFS driver for pc see this article). If you choose to use fat32 you can not copy files larger than 4 gb. And fat and exfat are not very safe (I mean dependable if you take your external hard drive without removing it first it can damage and it damages a lot...). Also last but not least if you use bootcamp and have a windows on your mac you will want to transfer files between your OS'.

So here comes the manual. There are couple of third party application which offer faster speeds and support (like paragon and tuxera) . But if you are a freebie like me you would prefer a free solution.

Here are the steps


  1.  Download and install osxfuse from  http://osxfuse.github.io/
  2. Make sure to check "MacFuse compatibility layer" when prompted.
  3.  Download and install NTFS-3G from http://macntfs-3g.blogspot.com/2010/10/ntfs-3g-for-mac-os-x-2010102.html
  4. If you are using Lion or above, you also need to download and install fuse-wait from https://github.com/bfleischer/fuse_wait/downloads
  5.  That's it enjoy your ability to read/write to NTFS volumes!


source:
http://www.macbreaker.com/2014/06/how-to-enable-writing-to-ntfs-hard.html

How to get rid of the new button on Chrome

Year 2014 was the year I learnt not to update. Any software update brought me anything but limitation. On the case of browsers though it is hard to resist update since they contain security patches. One recent update that disappointed me is by google chrome. After the update there is a "Person" button appeared on the right top corner of the window and it is occupying a lot of space.


Also I don't sign in to chrome so it is not useful at all.  To remove that button you can follow the steps below. Note that this is applicable to windows systems as well.

Steps
1. On your chrome browser go to "about://flags"
2. Find "Enable the new avatar menu"

3. From the radio button select "Disabled"
4. You are done. Restart your browser and enjoy.

Sunday, October 19, 2014

How to use safari to play music in Google Play Music

Recently, I discovered that Safari (7.0.6) is not playing music from Google Play Music website. Whenever I try to listen something I got the following error.
I thought it is due to Power Saver, a new feature of safari to reduce energy use. Whit this feature it blocks flash working in background. But in some cases as in this one it also blocks the ones you actually want to work. You can disable Power Saver all together or you can program it such that it will not work on some web site. I will show you how to disable it only for certain websites which is google play music for this case.

Steps:
1. Open Google Play Music website (music.google.com)
2. Log in
3. Click to a song or radio to listen
4. You will get the error as shown above
5. Go to Error Console by clicking command + alt + C  if your developer menu is not enabled follow steps on this link to enable developer menu first
6. Then copy and paste following code into command menu

  1. var jq = document.createElement('script');
  2. jq.src = "//ajax.googleapis.com/ajax/libs/jquery/1/jquery.min.js";
  3. document.getElementsByTagName('head')[0].appendChild(jq);
  4. // Wait 3 seconds.
  5. setTimeout(function() {
  6.   jQuery.noConflict();
  7.   jQuery('#embed-container embed').css({
  8.     'height' : '800px',
  9.     'width'  : '800px'
  10.   });
  11. }, 3000);

7. A large white box will appear. Refresh the page several times. And the song should start playing. If not restart safari and try steps starting from the first one.

A way to check wether this trick worked is to

1. Go to menu bar  Safari>Preferences
2. Go to advanced tab
3. Click details in field Internet Plug ins
4. You should see play.google.com on the exception list (i wish there is an add bottom on that list. That way would be much easier)

Lastly I want to acknowledge the source where I find this method. I found this from another blog https://grahamwalters.me/2014/02/24/how-to-fix-google-play-music-not-playing-in-safari/

If my explanation is not enough for you give a check to  this blog.


Activity Window on Safari 6 and higher

Hi there. Today I want to share my experience with safari 6, newest version of apple’s web browser. First of all I like the unified adressbar. Although it is a catchup I think they implement it better than chrome. Because in chrome when you have too many tabs you can’t see the title of the page you are browsing. Anyway I am writing this post for something else. It is weird that I realize the lack of activity window just in an hour. cmd+option+a doesn’t pop up activity window anymore. But it is still there, although it is changed a little bit, they just hide it. To activate it again.

 In menu bar go to Safari>Preferences…

 Than in advanced tab click “Show Developer Menu in menu bar” And it is done.

You can use “cmd+option+a” or reach it through menu Develop>Show Page Resources

 I know that safari 6 is our for sometime. Now even version number is 7. This post originally published on my old blog oaringcore.worldpress.com in August 2012. I copied it to here because for another post I need explanation.

Saturday, December 28, 2013

How To Change Web Clip Icons

Today there is an app for most of the things at least for iPhone. But yet there might me some stuff you care only accessible from a website. For such things iPhone has ability to create shortcuts to your home screen. So far so good. The bad thing is many of the websites do not care about us saving their link to home screen. Thus they don't add a tiny attribute to give us good looking icons.

To me that website was T-Mobile's website. It has a very beautiful mobile website accessible from beta.my.t-mobile.com but not that good mobile app. Thus I decided to replace it with a website shortcut. But safari gave me this ugly icon. iPhonenewzealand.co.nz  but it wasn't working probably due to changes on iOs 7. There are plenty of solutions even one from apple for developers to add an apple-touch-icon attribute but I don't have access to T-Mobile's website so those were irrelevant.
 Then I spend couple of hours online to find how to change those icons. But I couldn't find anything good. The closest was an article on

Long story short I discovered this

Steps
1. Go to Settings>Safari>Advanved  and enable Web Inspector

2. Open website you want to bookmark to home screen and let your phone to be active.
3. Connect your phone to your mac with usb cable.
2. Open safari from your mac. (I am not sure it is possible with windows)
3. Go to Develop>"Your name here"'s iPhone and pick your website (if you don't have develop tab on your menu bar check this link to see how to activate it)

4. Right click to html tag and click edit as html

5. Add following code to proper place. (not inside a script) it is probably a good idea to add it right after other <link> tags.
<link rel="apple-touch-icon" href="the address of the icon goes here"/>

6. Click anywhere to make code not editable.
7. On your hone Click This icon (share icon)

8. Click add to Home Screen. You will have a good looking icon at your home screen
9. Enjoy


export video transcript

YouTube Transcript Exporter YouTube Transcript Exporter Enter a YouTube video ID to fetch its transcript. Export Tra...